In this article, we will discuss how to use the Java Client Library with Elasticsearch to create and insert documents into an index. Whether you are an experienced programmer or a novice, you can use this guide to quickly and easily create and index documents in Elasticsearch.
The Java Client Library is a high-level library that allows you to interact with the Elasticsearch cluster. It provides a simple and intuitive interface to the Elasticsearch server. With the Java Client Library, you can easily create an index, add documents to the index, and perform searches.
Perquisite
You need to install the following things.
- Elasticsearch
- Java
Maven configuration
We need the following Maven dependencies.
    <dependency>
        <groupId>co.elastic.clients</groupId>
        <artifactId>elasticsearch-java</artifactId>
        <version>8.4.3</version>
    </dependency>
    <dependency>
        <groupId>com.fasterxml.jackson.core</groupId>
        <artifactId>jackson-databind</artifactId>
        <version>2.12.3</version>
    </dependency>
    <dependency>
        <groupId>jakarta.json</groupId>
        <artifactId>jakarta.json-api</artifactId>
        <version>2.0.1</version>
    </dependency>
Creating Java Elastic Client
The Elasticsearch Java Client provides a method for connecting to an Elasticsearch cluster and lets us use its standard REST API. With the Elasticsearch Java Client, you can use REST calls to connect to an Elasticsearch cluster, making it easy to execute queries and get results quickly.
    @Configuration
    public class ElasticSearchConfig {

      @Bean
      public ElasticsearchClient getElasticsearchClient() {
            // Create the low-level client
        RestClient restClient = RestClient.builder(new HttpHost("localhost",
            9200))
          // new HttpHost("tvxels-ho1-ct00004.mirs.aws.r53.xcal.tv", 9200))
          .build();

        // Create the transport with a Jackson mapper
        ElasticsearchTransport transport = new RestClientTransport(restClient, new JacksonJsonpMapper());

        // And create the API client
        return new ElasticsearchClient(transport);
        }
    }
We can use the Elasticsearch Java client to connect to the Elasticsearch server and perform various operations. A standard REST API is used to access Elasticsearch resources and perform operations like searching products, creating indexes, inserting documents.
Create an index
First let us see how we can create an index using the Elastic Rest API in the Kibana console.
Rest API Endpoint – PUT /{index name }
We can also configure the index during creation by providing the setting in the request body like below.
    {
        "settings": {
            "number_of_shards": 3,
            "number_of_replicas": 2
        }
    }
We can provide those configuration settings in the request body if you wish to override the default setting of the index during creation.
Mapping – we can also provide the JSON structure of our document that the index is going to store.
Using the Java client
Let's create a model class to hold our index request. We used the Lombok library to remove boilerplate code.
    @Data
    public class IndexingRequest {

      private String indexname;
      private Object mapping;
      private Setting setting;

      @Data
      public class Setting {
        private String numberOfShards;
        private String numberOfReplicas;
        }
    }
Now create a service class which holds the logic to create the index using the ElasticsearchClient class.
      @Service
      public class IndexService {

        @Autowired
        ElasticsearchClient client;

        private ObjectMapper objectMapper;

        public CreateIndexResponse createIndex(IndexingRequest indexingRequest) throws IOException {

          CreateIndexResponse response = null;
          if (!indexingRequest.getIndexname().isBlank()) {
            Builder requestBuilder = new CreateIndexRequest.Builder().index(indexingRequest.getIndexname());
            if (Objects.nonNull(indexingRequest.getMapping())) {
              String json = objectMapper.writeValueAsString(indexingRequest.getMapping());
              requestBuilder.mappings(m -> m.withJson(new ByteArrayInputStream(json.getBytes())));
            }
            if (Objects.nonNull(indexingRequest.getSetting())) {
              requestBuilder.settings(s -> s.numberOfReplicas(indexingRequest.getSetting().getNumberOfReplicas())
                .numberOfShards(indexingRequest.getSetting().getNumberOfShards()));
            }

            System.out.println("index request " + requestBuilder);
            response = client.indices().create(requestBuilder.build());

          } else {
            // throw exception here
          }
          return response;
        }

        public GetMappingResponse getIndexMapping(String indexName) throws ElasticsearchException, IOException {

          GetMappingRequest mappingRequest = new GetMappingRequest.Builder().index(List.of(indexName)).build();

          return client.indices().getMapping(mappingRequest);
        }
      }
The first thing to do when using the Java Client Library is to create an index. You can do this by using the IndexRequest class. This class allows you to specify the index name and settings for the index. It also provides methods for creating the index and for validating the index. After you have created the index, you can add documents to the index.
The spring boot controller class creates an endpoint that handles our request and creates the elastic cluster.
  @RestController
  @RequestMapping("/index")
  public class ElasticIndexController {

    @Autowired
    IndexService indexService;

    @GetMapping(path = "create", produces = "application/json")
    public String createIndex(@RequestBody IndexingRequest indexingRequest)
    throws ElasticsearchException, IOException {
      return getResponse(indexService.createIndex(indexingRequest));
    }

    private String getResponse(JsonpSerializable response) throws IOException {
      StringWriter writer = new StringWriter();
      JsonGenerator generator = new JacksonJsonpGenerator(new JsonFactory().createGenerator(writer));
      response.serialize(generator, new JacksonJsonpMapper());
      generator.flush();
      return writer.toString();
    }
  }
Once you have added the documents to the index, you can perform searches on the index. This can be done by using the SearchRequest class. This class allows you to specify the search criteria and the fields in the index that you want to search. The SearchRequest class also provides methods for evaluating search results.
Get the mapping of the index
The index mapping describes the document format and fields (their types). Let's get the mapping details of an index.
Endpoint GET /{indexname }/_mapping
As we did not provide any mapping while creating the index, our mapping details will be empty as follows.
If we do not add mapping at the time of index creation, our index will not have mapping configuration. Depending on the document we are inserting, the mapping configuration will be updated automatically.
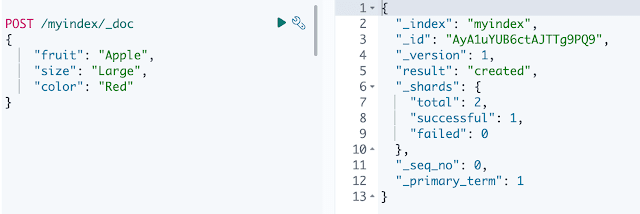
Let's add one document and see how our mapping gets updated. We use the _mapping endpoint and got below mapping details from elasticsearch.
We get below mapping details after inserting document.Based on the document we inserted the mapping is updated in index.
  {
    "myindex": {
      "mappings": {
        "properties": {
          "color": {
            "type": "text",
            "fields": {
              "keyword": {
                "type": "keyword",
                "ignore_above": 256
              }
            }
          },
          "fruit": {
            "type": "text",
            "fields": {
              "keyword": {
                "type": "keyword",
                "ignore_above": 256
              }
            }
          },
          "size": {
            "type": "text",
            "fields": {
              "keyword": {
                "type": "keyword",
                "ignore_above": 256
              }
            }
          }
        }
      }
    }
  }
In order for our index to hold documents in a common format, we must supply the mapping configuration. This will restrict other document formats and ensure document inserting follows the mapping.
      @GetMapping(path = "mapping", produces = "application/json")
      public String getIndexMapping(@RequestParam(name = "index") String indexname)
      throws ElasticsearchException, IOException {
        return getResponse(indexService.getIndexMapping(indexname));
      }
In summary, the Java Client Library makes it easy to create and index documents in Elasticsearch. With the IndexRequest and SearchRequest classes, you can quickly create an index and search for documents in the index.


.png)
